TESTLAB: Grow Room Designs: This is the most complete guide to different styles of Grow Room Setup

1st Room Type: Open Air Room (non-sealed room) Through Vented Reflector

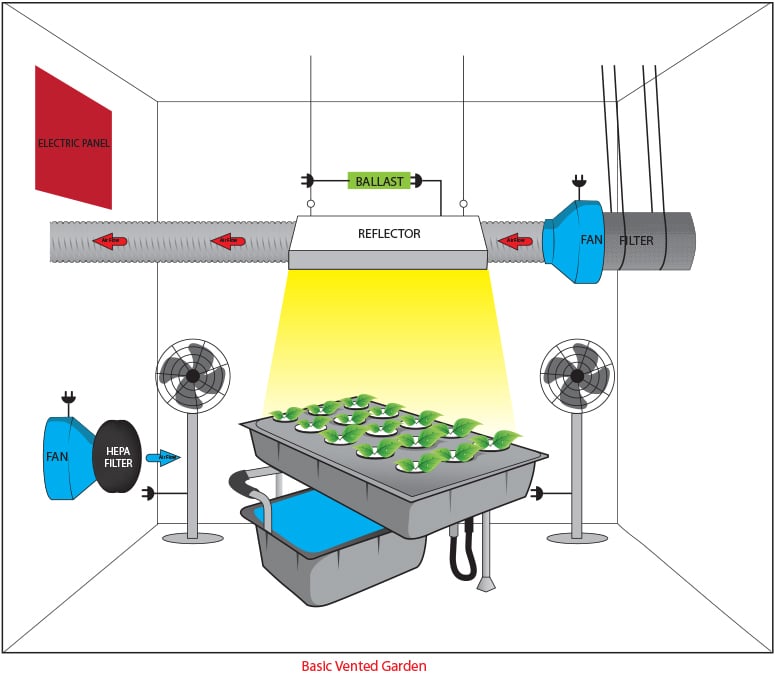
So here we’re looking at what we would consider a non-sealed room, meaning it’s an open-air room. Non-sealed means that there’s not an air conditioner that’s running the cooling capacity of the room, but it’s actually doing it through a vented reflector or just through a carbon filter. So, there’s air constantly coming in the room from outside and constantly leaving the room, exhausting the grow room air. So here’s our first diagram, it’s a basic vented garden. Let’s talk about some of the basic components of the garden.
What we’ve given you is just a hydroponic system. Any grow system could be in this room. This type of ventilation for this room is not specific to the system at all. You could be growing in any way but we’re throwing a hydroponic system in the picture just as representation, but what you also notice is there are oscillating fans. We at Monster Gardens recommend that you use 1 to 2 oscillating fans per 1000-watt light. With a 600-watt light, you might only need a single oscillating fan.
It is important to know that you do not want you oscillating fans to be blowing directly on your plants, they’re simply there to move the air around and also move the heat out from under the reflector in between the distance of the bottom of the reflector and the plants, basically cooling the top of your canopy. What you’ll also notice is that we’ve included an intake fan. As you can see, the intake fan on the left side of the wall is mounted on the opposite side from where the air is exhausted. We always mount intake fans on the opposite side of where the air is exhausting, so we’re creating a situation where we’re getting more of full air exchange in the room.
Now on the intake fan, it’s important to see that there’s a HEPA filter, you always want to use a filter on your intake. The reason being is dust, mold, bugs, all these elements can come into your grow room, and we want to eliminate it on the intake side. So here we have the exhaust ventilation on the top. As you can see, the air moves through the filter first through the grow room so it goes out of the grow room, into the filter, basically being clean so the smelly air is not dumping outside. Then it’s moving past the fan that’s pushing it through the reflector, through the ducting, and out the left side of the room, out of the building completely.
The intake is bringing the fresh air—the cool air—down on the floor on the opposite side of the exhaust. Now in this room, you do not see a CO2 generator or a CO2 tank, reason being is as an open-air room you do not need CO2 enrichment. Unless you have a sealed room, in most cases, you do not need CO2 enrichment. Time after time, we see gardens with these hybrid open-air/CO2 systems and what you end up doing in that situation is not even allowing the plant to really absorb the CO2. And it’s exhausting out at a faster rate.
Now the science behind CO2 is if you cannot enrich the environment up to 3 to 4 times its natural level, which that ends up being between 1,000 and 1,500 PPM, you’re not going to see a major yield increase. So if you’re just trying to get the CO2 up just a couple of hundred points, it might be an inefficient use of your money. You might not be getting that to equate to plant yield.
Now notice that there’s not a dehumidifier inside this room. There could be a dehumidifier if the lights were on a temperature controller that was slowing down the fan and speeding it up where the air movement was becoming a crawl, or not moving at some point. The dehumidifier would be great at that point to help dehumidify as the ventilation slows down. So there could be a dehumidifier in this room, but if you’re in Arizona, if you’re in parts of Nevada, where you typically have dry weather all throughout the year, you might not need a dehumidifier at all.
2nd Room Type: Open Air Room (non-sealed room) Non Air-Cooled Reflector on a Light Mover
So here’s our room example #2. This is an open-air room with non air-cooled reflector on a light mover. Now the light mover is not critical to non air-cooled reflectors, we’re just showing you another component that a lot of growers use in the garden. Light movers do a great job of diffusing the heat of light, evening the flower production from one side to the other side of the garden. So you don’t have large flowers in the middle, but it’s more even throughout the canopy.
Light movers do not replace another grow light. The yield that stated that you get a benefit from is really within an 18 to 24 distance moving back and forth. More than that, you’re really just getting the same yield over a greater space. To get a yield increase—which at Monster Gardens you’d really just quantify maybe 10 to 15 percent with a light mover—the real goal is to get even flower development and to diffuse any heat that might be coming off the reflector. Especially if you’re using a non-vented reflector. But again, you do not need a light mover with a non-vented reflector. You typically just raise your reflector up to that stated distance you hear which is 18 to 24 inches above your canopy.
So the next item to look at in this grow room is the exhaust system on the left, top roof of the grow room. You’ll see here just as this first example, we used a filter, then a fan, and then the ducting to move outside the room. Now you notice that the fan filter, then ducting, is actually mounted vertically. We’re just doing this as a representation to show you that the fan filter should always be at the top, or the ceiling, at the grow room exhausting out. That way it’s exhausting the hottest air out first. We didn’t want to put it at a 90-degree angle, just for the purpose of the picture, so it wasn’t in front of the light rail.
Now as you can see, the red arrow is pointed at the muffler. What is a muffler? It’s actually sound dampening material that is inside a tube, that goes on the blow side of the fan, connects to the ducting, and really what it’s doing is quieting down the noise that the fan is making because of the air movement. So that on the other side of the ducting—maybe it’s on the other side of the room or outside of the building—you’re not hearing the noise of the fan. So in this representation, we’re showing you the muffler as an option to quiet down the exhaust line in your grow room.
So just as in the first diagram, this grow room, the intake is on the floor. In this room, it’s on the right side, on the right wall, on the bottom. And again, the exhaust is on the opposite side. This way we’re ensuring that there’s a full air exchange in the room for the new air or the freshest air is exhausted out. You also notice there’s not a dehumidifier, just as in the first representation of a grow room. You could use a dehumidifier in some situations, but it’s not the most efficient way of doing it if the air is always flowing through the room without slowing down.
3rd Room Type: Open Air (non-sealed) 2 Grow Rooms with Simple Grow Systems
Now here is our 3rd grow room example. Here we have 2 rooms in 1 room. These are actually 2 grow tents—it could be 2 grow boxes you might have built at home. So as you can see here, there is not a dehumidifier thought there could be as we stated before in the two previous examples. There is an exhaust on the ceiling with a muffler on it. There is an inline filter on the ceiling, and let’s talk about that a little bit.
What is an inline filter? An inline filter is actually a filter that doesn’t have an end, it has 2 open sides and it filters the air as it moves through that chamber. These are new. Inline filters used to exist but weren’t really used because they weren’t that great, but now inline filters are actually just as good if not better than regular filters. So here we’re using 1 filter for 2 grow tents at the very top chamber to show you that. And then we’re using an intake at the base. So as you can see, the hot air is going to move through the top of the tent and then it’s going to raise and move through the duct line. This way, as you’ve seen in the previous rooms, you’re exhausting the hot air out of the top of the room first and then the cool air is going to come in through the base of the room, going into the base of the tents.
As you can see, the cool air at the base is actually being split by a splitter on a single airline that’s splitting the two going to both tents. So the air is actually coming in fresh, moving through the base of the tents, at the top of the tents, up and out through the room. You also notice that this is an open-air system, because of that, there isn’t really a need for CO2 enrichment, as we stated in the first video.
You’ll also notice there’s an oscillating fan in each grow tent. A grow tent, in the size of a 2x2, 3x3, 4x4, or 5x5 should have at least one oscillating fan inside. We’ve noticed that box fans actually do quite a good job, hung in the corner of the tent versus the side. The box fans have a very large blade so they can be on the low setting and actually get great air movement inside the tent, instead of using multiple clip fans to do the same job.
4th Room Type: Open Air (non-sealed) 2 Independent Air-Cooled Reflectors with Flood/Drain Grow System
So this is our last open-air example. Here we have a scenario that we have not seen in the previous 3 examples. We have 2 air-cooled reflectors that are independent. The air is actually running through these reflectors and it’s not touching the room. It’s coming in through outside, it’s running through the reflectors, cooling them, then leaving the room. But what we’re using fro the exhaust line to actually move the air through the room, to cool the actual grow room, is the same scenario we had before.
We have an exhaust fan, then this filter fan, muffler to quiet it down, and going up through the ceiling, as you can see here on the left roof. And as we had done before, you can actually put that at a 90-degree angle to bring that filter fan and muffler closer to the roof. That’s actually a better representation, but we didn’t want to show you that, because in a lot of scenarios and the 90 can actually decrease the airflow of a fan. But in most situations, somebody would actually take that fan filter muffler on the top left and put an elbow on it and actually hug it against the ceiling.
But as you can see again we have our intake on the very opposite side of the fan and filter on the left ceiling, the intake’s on the right side on the floor, bringing the cool air in first. So there’s a full air exchange in the room. As you can see, this is 2 flood tables—again we’re just throwing a system in here to give you representation, you could have any grow system. Because there are 2 lights, we have 2 oscillating fans and there’s no humidifier needed in most situations, but you could, of course, add a humidifier if for some reason the room’s air was slowing down or coming to a stop because of a temperature controller that you might be implementing.
So again, as you can see, the hot air is actually moving through the reflectors independently. That way the air is never touching the room. This is a really efficient way if you’re using air-cooled reflectors, to cool the reflectors without creating more air movement through the room. The reason why you want to decrease a lot of air movement through the room in some scenarios is that you’re trying to possibly temperature control the environment a little bit more, and cooling the lights independently without using the air inside the room, allows you some more functionality with this.
Now, of course, we use the muffler on the top left, on the exhaust to quiet the exhaust line, as we had told you before. And in most situations that actual exhaust line would be at a 90-degree angle with the fan filter/muffler, parallel against the ceiling.
So this is our last open-air example, stay tuned for our next video that we’ll be putting out that will show sealed-room examples!
About the Author


